WORK ORDERS
Contents:
Create Work Order: Quick Work Order
Create a New Work Order with costing
With the Work Order Module, you will be
able to create new work orders, assign, print and email work order tickets,
view on a calendar, view schedule and status of work orders and view work order
locations.
·
A work order can come from
a Contract or Job; these are usually recurring. Example: Quarterly Strip and
Wax or Monthly Window Cleaning.
·
You can also create one-time work orders,
such as billable customer request or non-billable customer complaint.
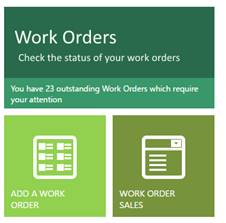
Work Order Navigation
·
Work
orders tile will send you to the Work Order Status Tab. You can also
access the Work Order Status tab by going the menu select work orders>Work Order Status.
·
Add
a Work Order tile. This will send you to the add a
Quick Work Order feature. You can also access this feature by going to work
order on the menu and the selecting Quick
Work Orders Option
·
Work
Order Sales. This tile will send you to the work
orders Sales tab. You can also go to the menu select Work Orders>Work Order Sales
Work Order Calendar
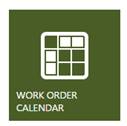
Work Order Calendar: Click on the Tab Work Orders to view your
calendar. You can also access the work
order calendar by clicking on the Work
Orders menu. Color coding = Yellow
is an open work order, Blue is a completed
work order, Green is a recurring work order
generated from the jobs module. Red is for
cancelled work orders.
You are able to
apply filters in the calendar by employee assigned and you can change the view
to display different days.
How to create a new work order?
Recurring Work Orders
To create recurring work orders, such as monthly window cleaning, you need to create a job first and then create a job service. The only difference between recurring work orders from a Job and the one-time work orders is that the system will know to create work orders automatically and it will assign the work order automatically from the Job service. A recurring work order coming from a Job Service will look exactly as a onetime work order. It will also be available in the work order sales module. To see how to create a recurring work order go to the Jobs module
One Time Work Orders
Depending on the level of financial
detail needed, you can create a work order from the quick work order or the work
order sales tab. A quick work order feature does not include financial
information. However, it becomes automatically available in the work order sales module; where you can
later add the financial details if needed.
Create Work Order: Quick Work Order
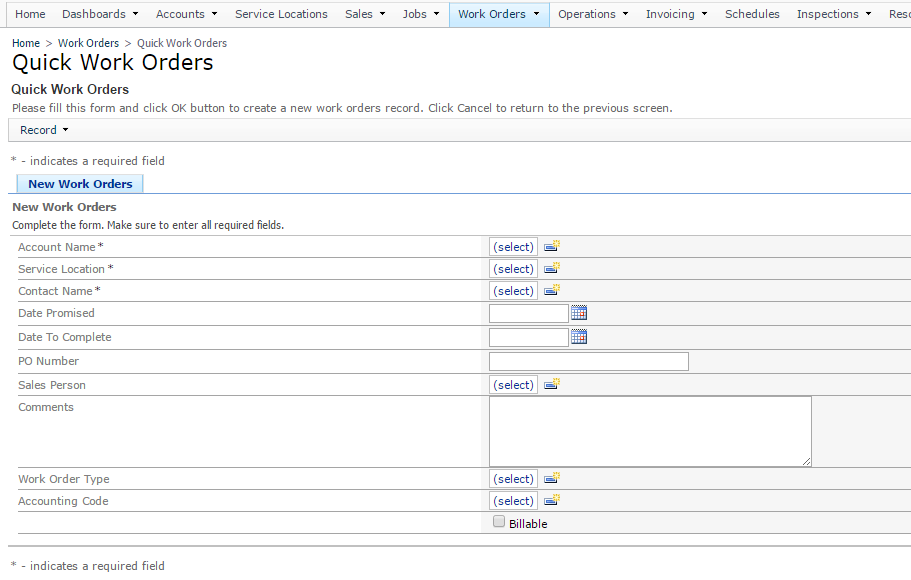
Go to Work Orders>Quick Work Orders. The Quick Work Order option send
you straight to the New Work Order tab.
A work order consists of two parts, the top information contains basic
information, this is like a header. The second part is work order details right below the header. In the work order
details, you assign the work to be done and the person responsible for
verifying the work order gets completed, such as supervisor or manager. The
work order details will go down to CC Mobile Application to the assigned
person, this way they can close from the field.
Quick Work Order Header
Account
Name: Select from the list or add a new Account with the ![]() option.
option.
Service
Location: This is the location where the Work Order
is to be performed. Select from the list or create a new service location with
the ![]() option.
option.
Contact
Name: Select the name of the person who
requested the work order, this is usually the building tenant or the building
main contact, you can also create a new contact with the ![]() option.
option.
Date
Promised: Date promised to start the work order
Date
to Complete: Estimated date when the work order
will be finalized.
PO
Number: Optional field, enter PO Number if
available.
Sales
Person: Optional Field, if available.
Comments:
Optional field, provide details about the work order, such
as key location, arrival time or cleaning specifications.
Work
Order Type: Select a work order type. Work order
type is used to separate the type of work; to modify go to Administration>Admin Module>Work Order Type. Work order types already in the system are:
Periodic Work:
this is pre-schedule work and it is used for Work Orders from a Job or
Contract.
Mobile Request:
This applies by default to any work order created with CC Mobile.
Connect:
This work order type will make work orders available in Customer Connect Portal.
Work orders also using the Connect type will send notifications to your account
Contact. The contact will get notified every time there is a work order change.
Accounting
Code: (for Accounting Software
integration), the accounting code must match your accounting software. This is
the revenue code if the work order comes from a Job or if it is assigned to an
employee. If the work order is assigned to a subcontractor, you would select an
Expense Accounting code.
Billable:
Select billable if you want the work order to create an invoice.
Click Ok after entering all desired Information. To finalize the work
order you must enter the work order
details below.
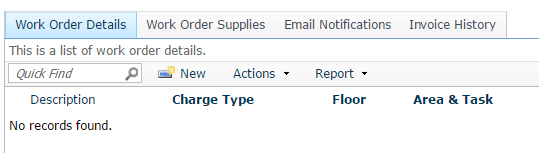
Work Order Details
After creating a New work order, you will have to enter the work to be done and assign to the employee responsible for closing the work order. To enter Work Order details, Click on New.
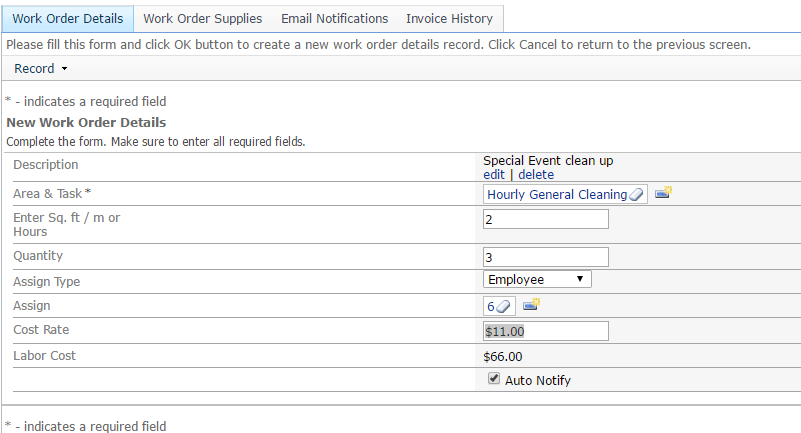
The new Work Order Details window will come up; you will be able to create
as many work order detail as you want in each work order. (The work order won’t
be marked as completed until all Work Order details are marked as completed)
Description: Enter a detailed description of the work to be done.
Area and Task: Select Area and task to be cleaned, this is based on your catalog of services (linked to a cost of services) Example: Hourly Cleaning. You can also add a New Area and Task
Enter Sq ft/m or Hours: Optional field, if you want to track your cost enter the SQFT, hours or meters the work order will require to complete. In this example, because Area and Task is Hourly Cleaning, I will enter 2, the system will calculate the cost of 2 hours of service.
Quantity: Optional. This refers to the number of employees, it will be used to calculate the cost. In this example. 3 employees working to complete the work
Assign Type: Select if assigning to an Employee or Subcontractor
Assign: Select the employee or subcontractor responsible for closing the work order.
Cost Rate: Optional field used for costing. For this example, how much will you pay per hour to each employee?
Labor Cost: Click on Calculate and the system will calculate Labor cost based on the information provided.
Auto Notify: If Auto Notify is selected, the system will send an automatic email to the assigned person, site services coordinator and supervisor.
After entering the work order details, you can save and the work order will be ready to go to CC Mobile, you can also print the work order if needed. Right next to Work Order Details there are 3 optional tabs. At this point you can save and the work order will be ready, or you can enter Supplies, add email notifications if needed.
Optional. The second tab “Work Order Supplies” is to track the cost of supplies at the work order level, add as many supplies to the work order as you need. The system will calculate the cost of supplies.

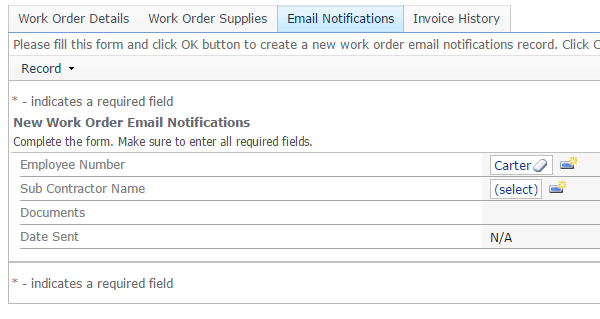
If you wish to send this work order to any other employee besides the person Assigned, Site Services Coordinator and Supervisor. You can add and email Notification to be send out to another employee or subcontractor.
Once the work order has been closed and the invoice marked as completed. You will be able to see it in invoice history.

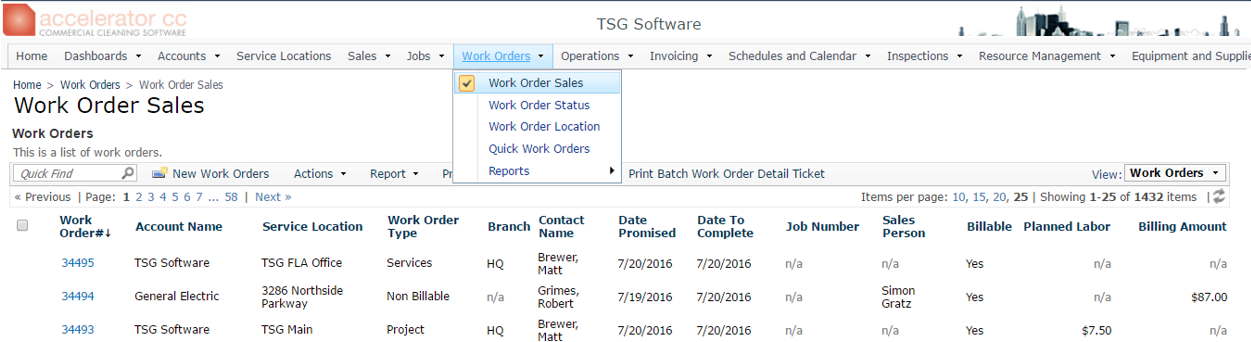
Work Order Sales
Work
Order Sales contains ALL Work Orders, plus
financial information. Depending on the level of financial
detail needed, you can create a work order from the quick work order or the work
order sales tab. A quick work order feature does not include financial
information. However, it becomes automatically available in the work order sales module; where you can
later add the financial details if needed.
Work
Order Sales will also display Recurring
or Periodic Work Orders, the work orders created from a Job Service, you
can modify a recurring work order without affecting the job service. In other
words, you can change the Date promised in a recurring work order without
affecting the original Job Service.
From
the Work Order Sales option, you can
print work orders, create reports, edit work orders or start a new work order. The
New Work Order from work order sales follows the same process as a quick work
order, where you have to create the work order and then enter the work order
details to assign the work.
Create a New Work Order from Work Order Sales (Budget Work Orders)
The New Work Order from work order sales follows the same process as a quick work order, where you have to create the work order and then enter the work order details to assign the work. The difference is that there will be more fields available, such as supplies cost, billable amount, markup percent.
First, go to Work
Orders>Work Order Sales. Then Click on New Work Order
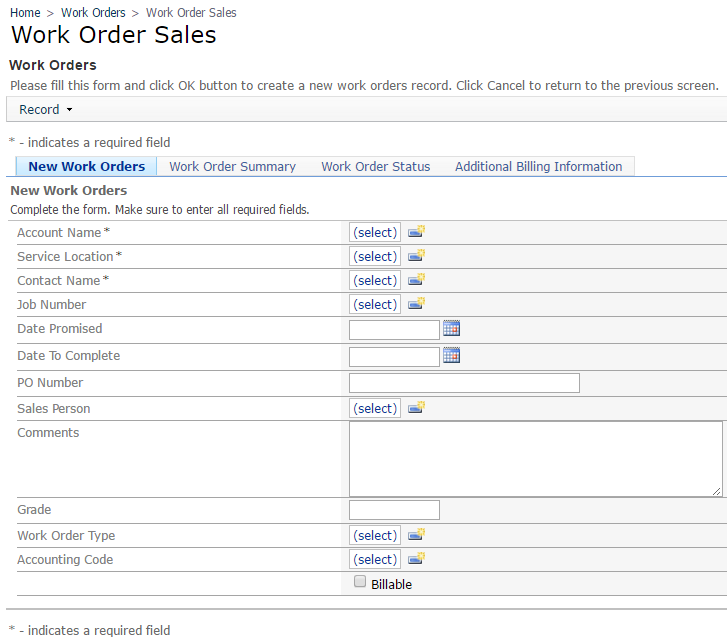
Account
Name: Select from the list or add a new Account with the ![]() option.
option.
Service
Location: This is the location where the Work
Order is to be performed. Select from the list or create a new service location
with the ![]() option.
option.
Contact
Name: Select the name of the person who
requested the work order, this is usually the building tenant or the building
main contact, you can also create a new contact with the ![]() option.
option.
Job
Number: (Optional) Select a job if you want
this work order to be linked to a contract.
Date
Promised: Date promised to start the work order
Date
To Complete: Estimated date when the work order will
be finalized.
PO
Number: Optional field, enter PO Number if
available.
Sales
Person: Optional Field, if available.
Comments:
Optional field, provide details about the work order, such
as key location, arrival time or cleaning specifications.
Work
Order Type: Select a work order type. Work order
type is used to separate the type of work; to modify go to Administration>Admin Module>Work Order Type. Work order types already in the system are:
Periodic Work:
this is pre-schedule work and it is used for Work Orders from a Job or
Contract.
Mobile Request:
This applies by default to any work order created with CC Mobile.
Connect:
This work order type will make work orders available in Customer Connect Portal. Work
orders also using the Connect type will send notifications to your account
Contact. The contact will get notified every time there is a work order change.
Accounting
Code: (for Accounting Software
integration), the accounting code must match your accounting software. This is
the revenue code if the work order comes from a Job or if it is assigned to an
employee. If the work order is assigned to a subcontractor, you would select an
Expense Accounting code.
Billable:
Select billable if you want the work order to create an
invoice.
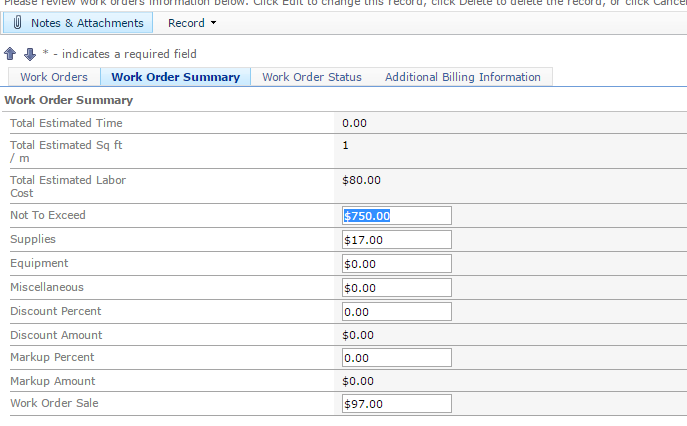
After completing the New work order tab, you can go to the second tab Work Order Summary (Optional) to enter financial information
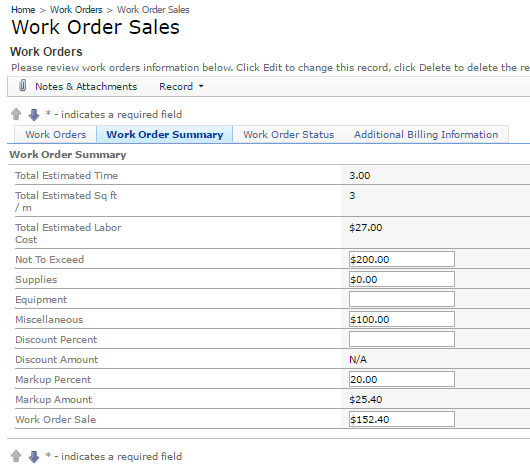
Total Estimated Time: You don’t have to complete this information; the system will automatically update from work order details.
Total Estimated Sq ft / m: You don’t have to complete this information, the system will automatically update from work order details
Total Estimated Labor Cost: You don’t have to complete this information, the system will automatically update from work order details
Not to Exceed: Complete this field if you have a cost ceiling to budget, such as subcontractor pay amount
Supplies: You don’t have to complete this information; the system will automatically update from work order details. This field is editable in case you need to make any changes
Equipment: You don’t have to complete this information; the system will automatically update from work order details. This field is editable in case you need to make any changes
Miscellaneous: Enter
amount of any extra cost.
Discount Percent: Enter discount percent if given.
Discount Amount: or enter discount Amount if given.
Markup Percent: If your work order sale amount should be a markup percent from the total cost, complete appropriate percentage and then hit Refresh Work Order Summary.
Markup Amount: You don’t have to complete this information; the system will automatically update.
Work Order Sale: If using markup percent do not complete this field. Just hit “Refresh Work Order Summary.” Or you could enter a Work Order Sale amount if desired. This is the amount the invoice will display.
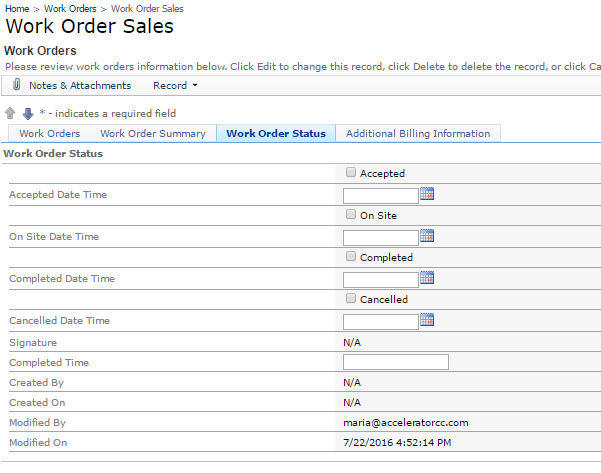
The next tab in work order sale is Work Order Status. You can make changes to the work order status,
accepted and onsite are optional. Marking a work order as completed will allow
it to go to invoicing if billable. If updating Status from this tab, please
remember to complete both, date and the status flag.
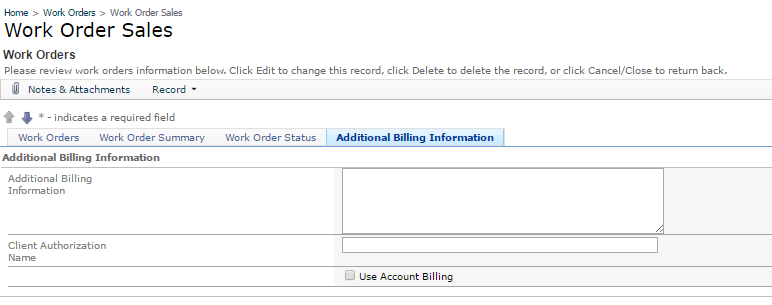
The next tab in the Work Order Sales is Additional Account Billing Information, this is
additional information for your Accounting Department, such as approval status
and approval date. Enter comments as necessary.
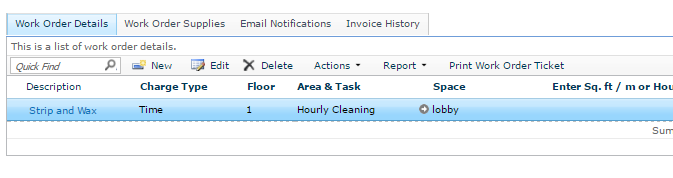
To complete the work order you must
complete the Work Order Details,
work order details will go to CC Mobile and will have all the detail and cost
information for the work to be done. Go to Work Order details right below the
Work Order header and click on New
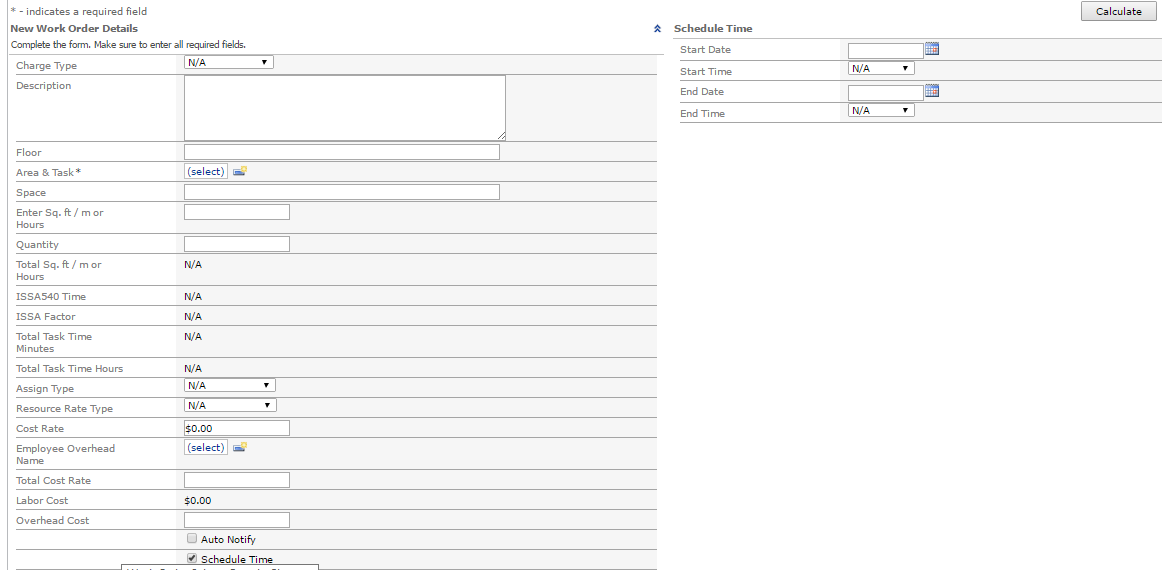
The new Work Order Details window will come up; you will be able to create as
many work order detail as you want in each work order. (The work order won’t be
marked as completed until all Work Order details are marked as completed)
Charge Type: Work Orders Sales can calculate estimated costs based on 4 costing methods.
Sq. Ft. = A cost for labor based on the square footage or meters of an area ($1.25 per sq. ft. of stripping and waxing).
Quantity Rate = A cost based on the Quantity of a task (.75 per window)
Fixed Cost = A task cost rate is fixed.
Time = Cost will be calculated based on a fixed cost for the amount of time spent on the task selected.
Area and Task: Select area and task or Create a New one
Description: Enter a detailed description of the work to be done.
Assign Type: Select if assigning to an Employee or Subcontractor
Assign: Select the employee or subcontractor responsible for closing the work order.
Auto Notify: If Auto Notify is selected, the system will send an automatic email to the assigned person, site services coordinator and supervisor. If the work order Type is connect any change to the work order will send a notification to the contact as well.
Schedule Time: If selected, you will be able to assign a start time
and end time for the employee assigned. The schedule time will be visible in
the Schedules and Calendar>Employee
Work Schedule
Charge Type: Work Orders Sales.
Work Orders Sales can calculate estimated costs based on 4 costing methods:
Sq. Ft. = A cost for labor based on the square footage or meters of an area ($1.25 per sq. ft. of stripping and waxing vct).
Quantity Rate = A cost based on the Quantity of a task (.75 per window)
Fixed Cost = A task cost rate is fixed.
Time = Cost will be calculated based on a a fixed cost for the amount of time spent on the task selected.
We will show you how to use each costing method using Work Order Sales.
Before you start, a
reminder on Area and Tasks:
Administration>Catalog Module>Area and Tasks
Service: this is the description of the service being requested and
PRINTS ON WORK ORDERS
Area: (Service)This is the usual areas where tasks are being
requested, i.e. Floors, Carpets, Furniture, etc...
Task: this is the production rate. ISSA 540 time is in Minutes, ISSA Factor id
how much gets completed based on the time you entered. We recommend an Hourly task:
Task
Description = Hourly Labor
Catalog – Leave blank
Classification – Leave
Blank
UOM – Hourly
ISSA 540 Time – 60 (60
minutes)
ISSA Factor – 1 (we get
1 task completed in 60 minutes)
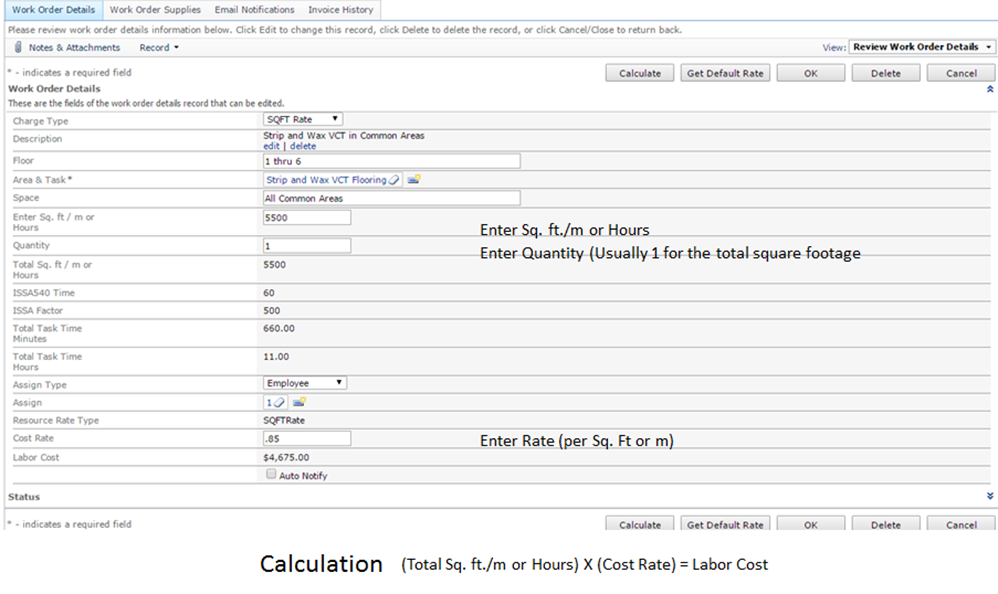
WORK ORDER COSTING: Sq. Ft Rate
Select Charge Type: SQFT Rate
Enter Description: Describes task being completed
Enter Floor(s): Enter floor where work order will be done
Select Area and Task: (Your production rate)
Enter Sq. ft. / m or Hours: Enter the Square ft. or meters of the task
Quantity: Enter the quantity of sq ft or meters (Usually 1)
Assign Type: Employee/Subcontractor/ or Crew
Assign: Select the Employee/Subcontractor/ or Crew
Cost Rate: Enter the Cost per Sq Ft/Meter/Hour
Select Calculate to calculate cost
Work Order Detail Square Foot Rate
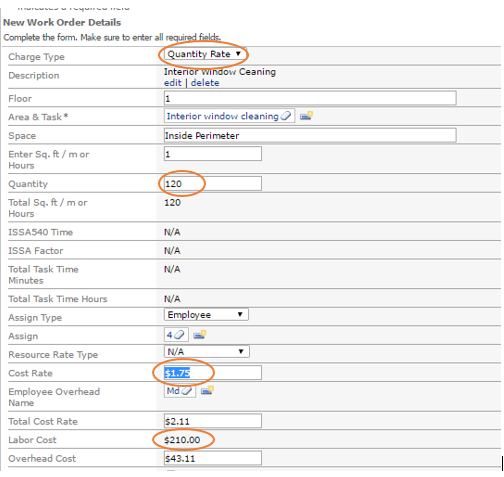
WORK ORDER COSTING: QUANTITY RATE
Select Charge Type: Quantity Rate
Enter Description: Describes task being completed (i.e. Clean Interior Windows)
Enter Floor(s): Enter floor where work order will be done
Select Area and Task: (Your production rate)
Enter Sq. ft. / m or Hours: Enter the Square ft. or meters of the task (Not used in Calculation)
Quantity: Enter the quantity (i.e. 120)
Assign Type: Employee/Subcontractor/ or Crew
Assign: Select the Employee/Subcontractor/ or Crew
Cost Rate: Enter the Cost per each Quantity entered in the Quantity field
Select Calculate to calculate cost. Calculation (Quantity X Cost Rate) = Labor Cost
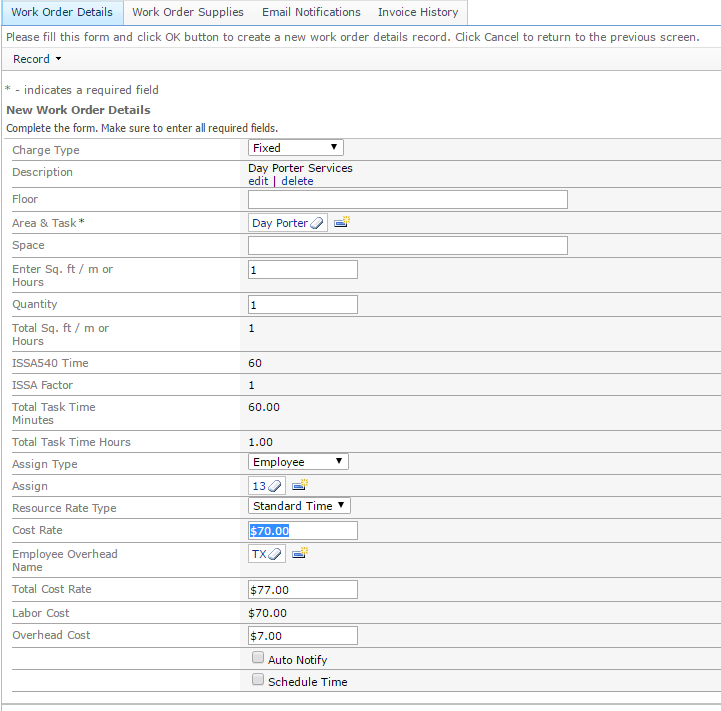
WORK ORDER COSTING: FIXED RATE
Select Charge Type: Fixed
Enter Description: Describes task being completed (i.e. Clean Interior Windows)
Enter Floor(s): Enter floor where work order will be done
Select Area and Task: (Your production rate)
Space: This is a reference field for further reference
Enter Sq. ft. / m or Hours: Enter the Square ft. or meters of the task (Not used in Calculation), just enter 1
Quantity: Enter the quantity (Reference only), enter 1
Assign Type : Employee/Subcontractor/ or Crew
Assign: Select the Employee/Subcontractor/ or Crew
Resource Rate Type:
Cost Rate: Enter the Cost rate, this is your fixed cost for this task
Select Calculate to calculate cost. Calculation Cost Rate = Labor Cost
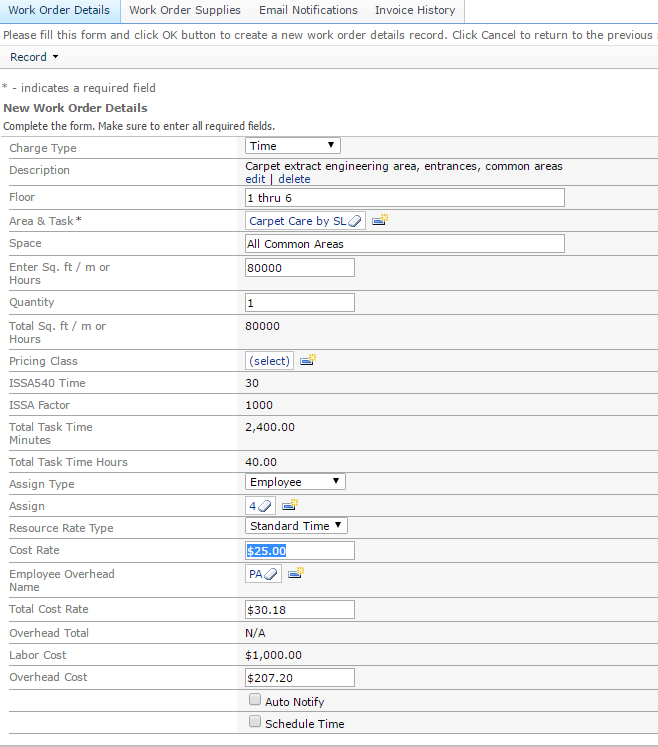
WORK ORDER COSTING: FIXED RATE
Select Charge Type: Time
Enter Description: Describes task being completed
Enter Floor(s): Enter floor where work order will be done
Select Area and Task: (Your production rate) (This will calculate the time estimated)
Enter Sq. ft. / m or Hours: Enter the Square ft. or meters of the task
Quantity: Enter the quantity of sq ft or meters (Usually 1)
Assign Type: Employee/Subcontractor/ or Crew
Assign: Select the Employee/Subcontractor/ or Crew
Cost Rate: Enter the Cost per Time (usually in hours) Displays on printed Invoice
Select Calculate to calculate cost. Calculation (Total Task Time Hours X Cost Rate) = Labor Cost
***Note: Time is calculated based on the Area and Task (Production Rate) and the Sq. Ft. /m or Hours entered. For example, you will be completing a carpet extract. The Area and Task has a production rate of, 1000 sq ft per 30 minutes. The total square feet of this job is 8000/sq. ft. Accelerator will calculate the hours for this task:
80000 sq. ft. / 1000 sq. ft. = 80
80 X 30 (minutes) = 2400 (Minutes)
2400 Minutes / 60 (mins per hr.) = 40hrs
40hrs*25=$1,000
PA overhead is 20.72%
Overhead Cost=1,000*0.2072=$207.20
Work Order Supplies
The second tab “Work Order Supplies” is to track the cost of supplies at the work order level, add as many supplies to the work order as you need. The system will calculate the cost of supplies. The total of supplies cost will then go to the Work Order Summary; you will have to click on calculate to update totals.

Work Order Summary
The total of labor cost and supplies cost will go to Work Order Summary. After you have completed all the work order details go back to work order summary and click on Calculate. This will update the information and you will be able to see the cost associated with the work order
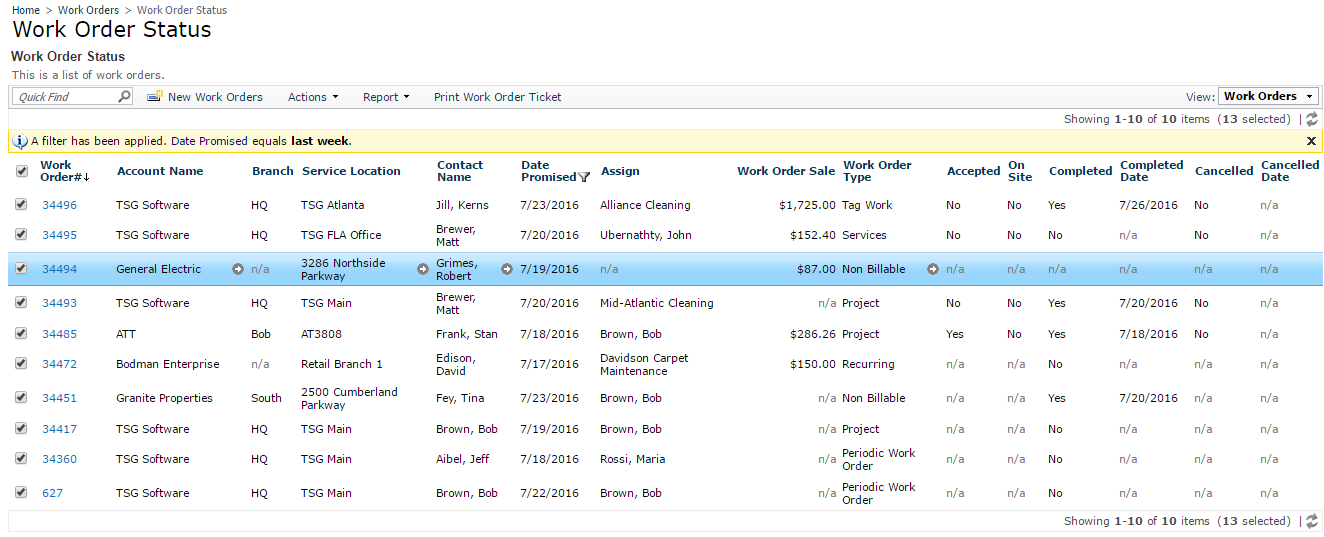
Work Order Status
Work Order Status is a different view
from the Work Order Sales, in work order
status you can complete, cancel or accept multiple work orders in a list
format. From the work order status, you can also print multiple work orders at once.
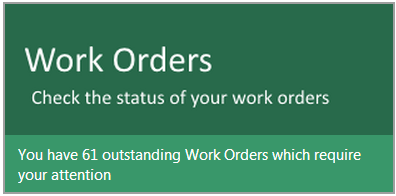
To go to Work Order Status, go to Home page, click on this Box to go to Work Order Status or from the menu go
to Work Orders>Work Order Status
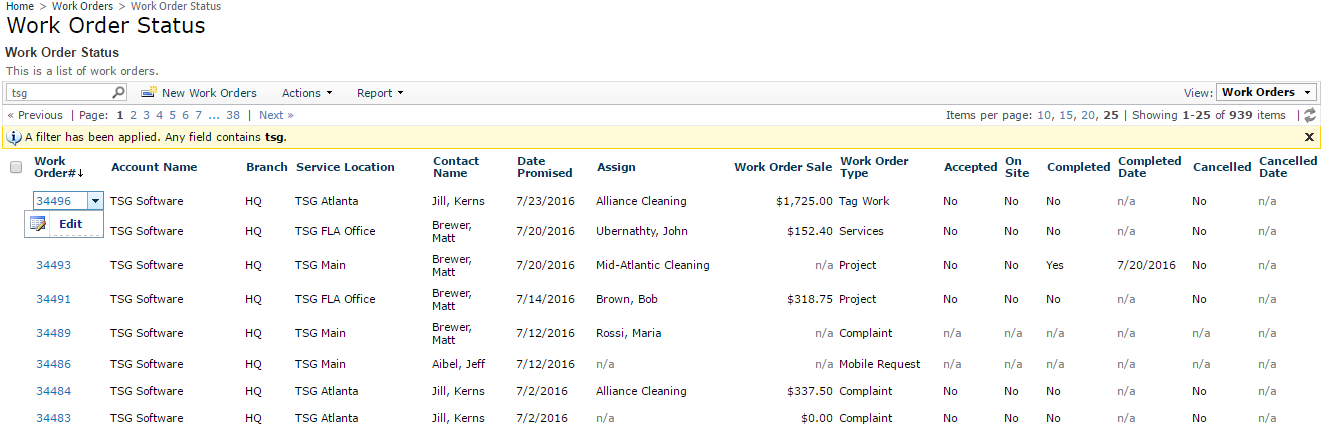
Change Status: Accept, Cancel or Complete Multiple Work Orders.
To change the Status from one work
order, click on the Work Order # or
right click and select Edit
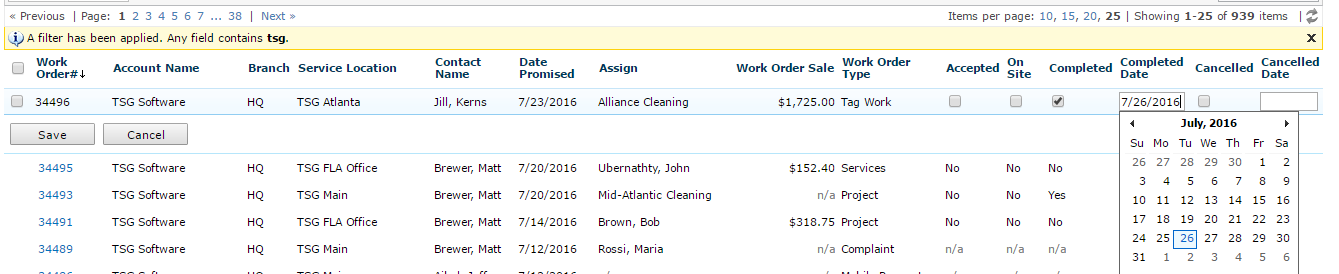
After clicking on edit, you will be
able to make changes on the work order you have selected. To close a work order
for example, mark the completed flag and then select the completed date. After
making the necessary changes click on
Save
Create Reports from Work Order Status, Work Order Sales or Work Order Location
Work Order Sales, Work Order Status and Work Order Location are 3 different views of all the work orders in the system. From any of these you can create reports, the columns to display will be different, this will be depending on the Work Order option you selected.
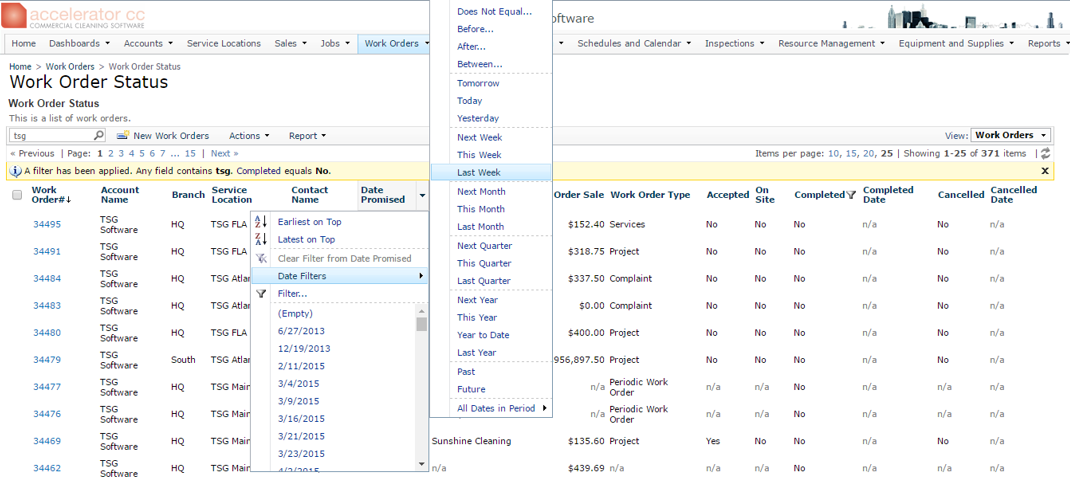
In the example; to create reports from work Order Status screen or any grid throughout the software, just hover the mouse over the title where you want to apply the filter. An arrow will show up on the right side of the title. Click on the arrow and apply the filter you need
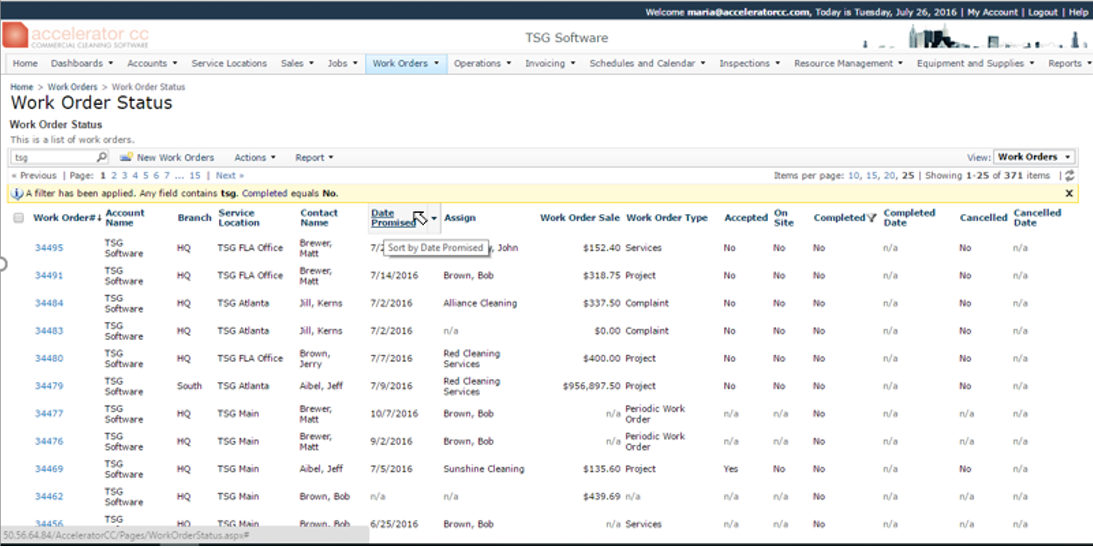
After clicking on the blue arrow a filter option will show up, select the filter you need, in this example we will apply a date filter for all non-completed work orders with date promised of last week.
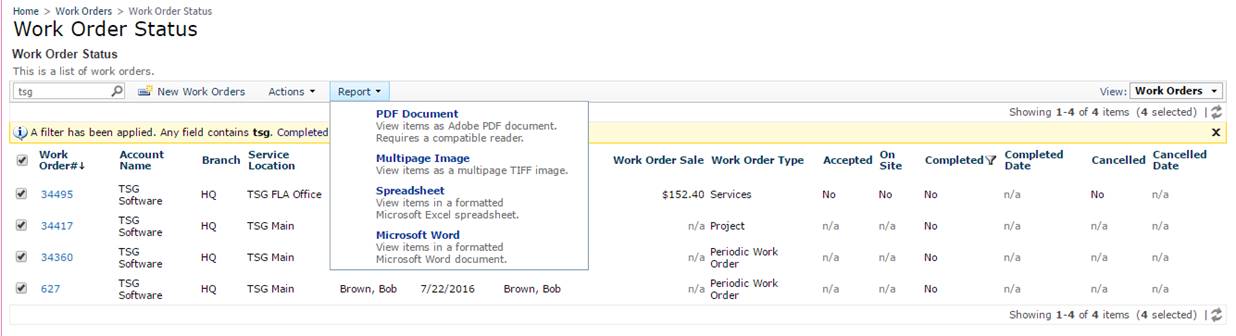
After applying the filter, we can print a report. The report will print only what we see on the screen. In the example, non-completed work order from last week, the report will print the 4 work orders on the screen. Click on report and select the format you want the report to be created.
Clearing Filters
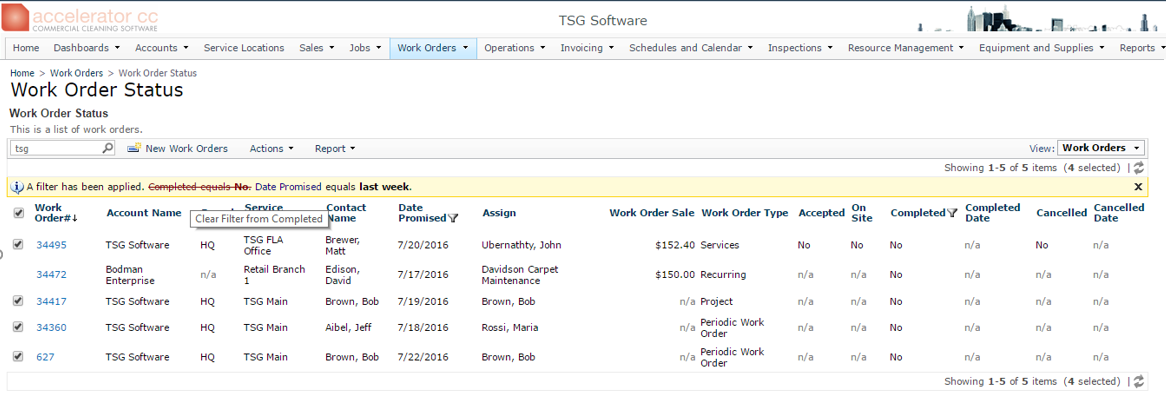
After printing the report, you can
clear one or all filters. To clear one filter, you can move the mouse over the
filter you want to remove, like the screen shot below. In the screenshot we can
remove the filter for completed status:
No by clicking on the pink line on this filter. You can also remove all
applied filters by clicking on the X
on the right.
Printing Work Orders
From the Work Order Status or from Work Order Sales, you are also able to Print work order tickets. You can select one or many. Just click on the square located on the left to select the work order. If you want to quickly select all the work orders displaying on the page, click on the square on the left right next to Work Order #. After selecting the work orders click on Print Work Order Ticket, to print a PDF of the selected work order(s).
![]()
![]()